Chocolate Cherry Buttermilk Bundt Cake

Summer BBQ series, Post 4 of 4

Summer is all about the fresh fruit. It’s peak cherry season right now, so if you find yourself with an excess of them, grab your cherry pitter and try out this recipe. Swap out the cherries for any summer berry; strawberries and blueberries would be amazing in this Bundt cake. Bundt cakes are great for BBQs because the design of the pan already adds an element of fancy. You don’t need to do much in the way of decorating one either. A sprinkle of powdered sugar, or a simple glaze, and you’re ready to go. Looks impressive, but requires so little effort. That’s so me. 😉

Chocolate Cherry Buttermilk Bundt Cake | Adapted from Bon Appetit

Ingredients

  • 3 cups all purpose flour
  • 1 tablespoon baking powder
  • 1 teaspoon salt
  • 1 2/3 cups sugar
  • 3/4 cup (1 1/2 sticks) unsalted butter, room temperature
  • 3 large eggs
  • 1 tablespoon lemon zest
  • 2 teaspoons vanilla extract
  • 3/4 cup buttermilk
  • 1 cup of fresh cherries, pitted and cut into quarters
  • 1 cup semi-sweet chocolate chips
  • Powdered sugar

Directions

Preheat oven to 350°F.

Butter and flour 10-inch-diameter Bundt pan.

Whisk flour, baking powder, and salt in medium bowl.

Using electric mixer, beat 1 2/3 cups sugar and butter in large bowl until light and fluffy. Beat in eggs, 1 at a time. Beat in lemon zest and vanilla.

Beat in dry ingredients in 3 additions alternately with buttermilk in 2 additions. Fold in chocolate chips and cherries.

Pour batter into prepared pan. Bake until tester inserted near center of cake comes out clean, about 1 hour.

Cool cake in pan on rack 10 minutes. Turn cake out onto rack and cool completely. (Can be made 1 day ahead. Wrap in plastic and store at room temperature.) Transfer cake to plate, sift powdered sugar over, and serve.

Sour Cream Chocolate Cupcakes

(also, “How to fake a recipe gone wrong”)

Summer BBQ series, Post 2 of 4
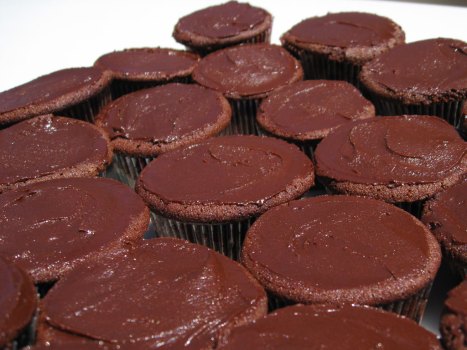
The thing about blogging about food you make is that sometimes you have food failures that are so atrocious that they should never see the light of day.  No one really wants to showcase their duds for all to see, but baking definitely involves a measure of “learn from your mistakes.” So while the chocolate cupcakes featured today were largely failure, you’ll see that with a positive outlook, you can sometimes turn fail into win. It’s just a matter of perspective. 🙂

Most of the time you can take any cake recipe and throw it into a muffin tin with no consequences. This recipe is an exception. The batter rises much more than any standard cake recipe, so loading it up into a muffin pan causes it to sink in the middle when it’s done. The lightness of the batter can’t support the tallish structure of a cupcake, so my end result was 24 sunken cupcakes. Those little divots mocked me.

Well thank goodness these cupcakes were going to a BBQ! The usual problem of taking frosted cakes to a BBQ is that after a while sitting in the sun, the frosting ends up being a gloopy mess. Not a problem with sunken cupcakes though! The cavities proved to be perfect for holding the frosting in its place, and once everything was smoothed out on top, they looked pretty decent given their initial state. Oh, and the frosting “surprise” was a nice touch too.

I’m glad to report that the cake recipe itself is delicious. It yields a very moist, tender crumb, even despite the sunken nature. Try making this in the two 9″ pans like the recipe recommends. I bet your results will be better than mine.

Sour Cream-Fudge Layer Cake with Chocolate Butter Icing | Cook’s Illustrated

Cake Ingredients

1 cup natural cocoa powder
2 teaspoons instant espresso powder , or instant coffee
1 cup boiling water
2 teaspoons vanilla extract
1/2 cup sour cream
16 tablespoons unsalted butter (2 sticks), softened
1 3/4 cups granulated sugar
2 large eggs , at room temperature
1 1/4 cups unbleached all-purpose flour
3/4 teaspoon baking soda
1/2 teaspoon table salt

Icing Ingredients

9 ounces bittersweet chocolate , or semisweet
8 tablespoons unsalted butter (1 stick)
1/3 cup light corn syrup

Directions

1. For the Cake: Adjust oven rack to center position and heat oven to 350 degrees. Grease two 9-by-1 1/2-inch round baking pans with shortening. Line pan bottoms with waxed or parchment paper; grease paper as well. Dust pans with flour; tap out excess.

2. Mix cocoa and instant coffee in small bowl; add boiling water and mix until smooth. Cool to room temperature, then stir in vanilla and sour cream.

3. Beat butter in bowl of electric mixer set at medium-high speed until smooth and shiny, about 30 seconds. Gradually sprinkle in sugar; beat until mixture is fluffy and almost white, 3 to 5 minutes. Add eggs one at a time, beating 1 full minute after each addition.

4. Whisk flour, baking soda and salt in medium bowl. With mixer on lowest speed, add about 1/3 of dry ingredients to batter, followed immediately by about 1/3 of cocoa mixture; mix until ingredients are almost incorporated into batter. Repeat process twice more. When batter appears blended, stop mixer and scrape bowl sides with rubber spatula. Return mixer to low speed; beat until batter looks satiny, about 15 seconds longer.

5. Divide batter evenly between pans. With rubber spatula, run batter to pan sides and smooth top. Bake cakes until they feel firm in center when lightly presesd anad skewer comes out clean or with just a crumb or two adhering, 23 to 30 minutes. Tranfer pans to wire racks; cool for 20 minutes. Run knife around perimeter of each pan, invert cakes onto racks, and peel off paper liners. Reinvert cakes onto additional racks; cool completely before frosting.

6. For the Icing: Melt the chocolate and butter in a medium bowl set over pan of almost-simmering water. Stir in corn syrup. Set bowl of chocolate mixture over a larger bowl of ice water, stirring occasionally, until the frosting is just thick enough to spread. Apply icing onto first cake layer and spread with a long metal spatula, top with second cake layer, top second layer with icing, spread and then ice sides. Serve.

Chewy Brownies

Cook’s Illustrated, how I love thee. Your recipes are created using the scientific method, and it calls to the nerd in me. You tell me to use the finest ingredients, not because a company is sponsoring you, but because the products really are excellent. You give me a recipe for brownies that involves three types of chocolate.

Could you be any more perfect? I’d dress you up and take you home to meet the folks if I could.

Seriously.

Okay now, let’s talk about these brownies.

Continue reading

Chocolate Mint Cookies

I don’t care that the holidays are over. I’m still going to pair peppermint and chocolate together. Just try and stop me! When they produce a cookie this good, you won’t think to protest either. If I hadn’t been too lazy to make the icing drizzle, they’d look a whole lot prettier, but 1) I hate dealing with powdered sugar (it gets EVERYWHERE), and 2) I don’t care if it looks pretty, just as long as it tastes fantastic. And these cookies do. Read on – I bet you’re intrigued.

Continue reading

Icebox Pinwheel Cookies

IMG_4894

Well I’m alive after a vacation in NYC and the lovely parting gift I got there, affectionately named The Stomach Flu. As I start the ball rolling again, today I present to you icebox pinwheel cookies. According to my copy of Joy of Cooking, icebox cookies got their name because the cookie dough needed to be refrigerated before rolling and cutting, or slicing, or what have you not. The refrigeration is in fact optional, and if you’re impatient like I am most of the time, you can just skip that step and use the recipe below for drop cookies.

Continue reading

Espresso Chocolate Cheesecake, Revisited

IMG_4879

So a while back I did a post about this Espresso Chocolate Cheesecake. At that particular time, I wasn’t baking it for any particular reason other than to fatten up friends and coworkers. I whipped the recipe out again this time for a special occasion though. It was LC’s birthday this weekend, and I was out of ideas for what kind of cake to make her. Luckily KC gave me an easy way out: cheesecake.

Now can I just start by saying that my cheesecakes never come out pretty? They always taste great, but they never resemble anything close to what you find in a restaurant or store. Go figure. I’ll have to work on it. But hey, the awesomet hing about a cheesecake is that even if it’s ugly, you can mask it with a nice coating of chocolate. 🙂

Continue reading

Yellow Cupcakes with Chocolate Mousse Frosting

IMG_4723

Ah, yes, the classic yellow cupcake with chocolate frosting. It’s the Betty Crocker or Duncan Hines cupcake that us Americans grew up with. For a recent potluck, I volunteered to bring a batch of cupcakes. However, I didn’t want them to be out-of-the-box type of cupcakes. I wanted to be inspired by the classic combination, but not recreate them with their cloying sweetness. So instead I turned to my copy of Joy of Cooking (which I am finding to be indispensable these days).

Continue reading

Chocolate Espresso Biscotti

biscotti

Hey everyone, I’m back! Sorry for yet another hiatus – I’ve actually spent the past week getting over the stomach flu. Man, was that miserable. Anyway, I have a backlog of things I want to post for you guys, so there’s plenty more after this one!

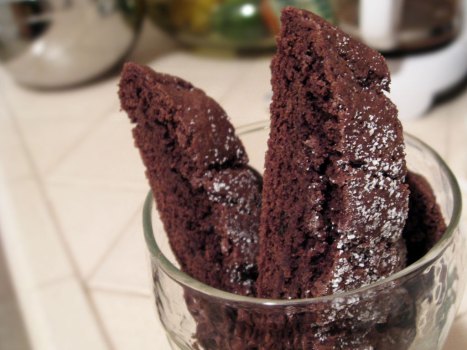
Now then. Chocolate biscotti! My parents visited me up in San Francisco for the first time in about four years over this past Labor Day weekend. While they were here, my mom requested a batch of her very favorite chocolate biscotti. I’ve had his recipe for eight years now and used to make it regularly until I moved to the Bay Area. Every time I go home to visit my parents, my mom always wants a batch, but I never have my baking supplies with me! So luckily this time, they were in my ‘hood and I could cater to the request.

Chocolate and coffee in a cookie. There’s nothing wrong with that combination in any way. These are great and super easy to make!

Chocolate Espresso Biscotti | Adapted from Epicurious

Ingredients

  • 2 cups all-purpose flour
  • 1/2 cup unsweetened cocoa powder
  • 1 teaspoon baking soda
  • 1 teaspoon salt
  • 3/4 stick (6 tablespoons) unsalted butter, softened
  • 1 cup granulated sugar
  • 2 large eggs
  • 2 tablespoons of instant coffee or espresso granules
  • 1 teaspoon vanilla extract

Directions

Preheat oven to 350°F. and butter and flour a large baking sheet.

In a bowl whisk together flour, cocoa powder, baking soda, espresso, and salt. In another bowl with an electric mixer beat together butter and granulated sugar until light and fluffy. Add eggs and vanilla and beat until combined well. Stir in flour mixture to form a stiff dough.

On prepared baking sheet with floured hands form dough into two slightly flattened logs, each 12 inches long and 2 inches wide, and sprinkle with confectioners’ sugar. Bake logs 35 minutes, or until slightly firm to the touch. Cool biscotti on baking sheet 5 minutes.

On a cutting board cut biscotti diagonally into 3/4-inch slices. Arrange biscotti, cut sides down, on baking sheet and bake until crisp, about 10 minutes. Cool biscotti on a rack. Biscotti keep in airtight containers 1 week and frozen, 1 month.

Chocolate Citrus Biscotti

Biscotti1

I was home visiting the parental units recently and decided to bring half my pantry along because, well truthfully, the baking helped me get through the weekend. Now wait, don’t get me wrong. I love my parents, but going home to visit means relinquishing all forms of adult freedom and independence. For someone who’s been living on her own for eight years, the smothering gets to be a bit overwhelming after a couple of days, hence my coping mechanism: baking.

Continue reading

Orange Chocolate Bundt Cake

img_3341

So if you guys haven’t noticed yet, Joy the Baker is probably my favorite food blogger. This is the story of the Bundt cake that made it so. B introduced me to this recipe and Joy’s blog just a little over a year ago, and I fell in love with both. This recipe calls for a Bundt pan, which I did not own at the time but was determined to do so once I had a taste of the cake. There’s so much that I love about this particular recipe that it’s become one of my go-to recipes. Continue reading