Strawberry Lemon Curd Cheesecake

When meeting the boyfriend’s entire extended family for the first time, cheesecake is probably a bit of an ambitious dessert to attempt. Even for the seasoned baker, it’s so easy for a cheesecake to go from good to ugly. One wrong step and you have a top riddled with gaping cracks. Or maybe it doesn’t set completely. Or maybe it gets overcooked. So what do I do? Of course I decide to bake a cheesecake for the family gathering.

Of course.

And thank god for lemon curd and strawberries. You can’t tell from the picture, but this cheesecake had no less than 6 ginormous cracks on its top. I didn’t have a big enough pan to cook it in a water bath, okay?! Well if you’ve learned anything about reading my blog is that I find ways to cover my tracks. I’m sneaky like that.

Cracks? All the more to stuff with delicious lemon curd! Can’t glaze the cake properly? Cover it in an impressive spread of strawberries! I win!

This cheesecake is pure heaven. I normally wouldn’t stray from my unadulterated NY-style recipe, but the inclusion of lemon curd in this recipe was too good to pass up. I don’t believe in cheesecakes with sour cream in them, but this one had just little enough to not detract from the lovely texture of straight-up cream cheese. Yum.

Usually, you have to let cheesecake sit out for a little while so soften up the texture, but I found this one to be quite soft, so feel free to serve it straight out of the fridge.

Strawberry Lemon Curd Marbled Cheesecake | Adapted from Gourmet, July 2006

Ingredients
For lemon curd:

  • 1 teaspoon finely grated fresh lemon zest
  • 1/2 cup fresh lemon juice
  • 1/2 cup sugar
  • 3 large eggs
  • 1/2 stick (1/4 cup) unsalted butter, cut into small pieces

For crust:

  • 1 1/3 cups finely ground graham cracker crumbs (5 oz)
  • 1/3 cup sugar
  • 1/8 teaspoon salt
  • 5 tablespoons unsalted butter, melted

For filling:

  • 3 (8-oz) packages cream cheese, softened
  • 1 cup sugar
  • 3 large eggs
  • 3/4 cup sour cream
  • 1 teaspoon vanilla
  • Special equipment: a 9- to 91/2-inch (24-cm) springform pan
  • 2 pints/baskets of strawberries

Directions
Make lemon curd:

Whisk together zest, juice, sugar, and eggs in a 2-quart heavy saucepan. Add butter and cook over moderately low heat, whisking frequently, until curd is thick enough to hold marks of whisk and first bubbles appear on surface, about 6 minutes.

Force lemon curd through a fine-mesh sieve into a wide shallow dish, scraping bottom of sieve, then cover surface with wax paper. Cool completely, stirring occasionally, about 30 minutes.

Make and bake crust:
Put oven rack in middle position and preheat oven to 350°F. Invert bottom of springform pan (to make it easier to slide cake off bottom), then lock on side. Stir together crust ingredients in a bowl, then press onto bottom and 1 inch up side of springform pan. Place springform pan in a shallow baking pan and bake 10 minutes, then cool crust completely in springform pan on a rack.

Make filling and bake cheesecake:
Reduce oven temperature to 300°F.

Beat together cream cheese and sugar in a bowl with an electric mixer at medium speed until smooth, 1 to 2 minutes. Reduce speed to low and add eggs 1 at a time, beating until incorporated. Beat in sour cream and vanilla until combined.

Pour two thirds of cream cheese filling into crust, then spoon half of lemon curd over filling and swirl curd into filling with a small knife. (Avoid touching crust with knife to prevent crumbs getting into filling.)

Bake cheesecake until set 1 1/2 inches from edge but center trembles when pan is gently shaken, about 45 minutes. (Center of cake will appear very loose but will continue to set as it cools.) Transfer springform pan to a rack and immediately run a knife around top edge of cake to loosen. Cool completely, about 2 hours, then chill, uncovered, at least 4 hours.

Cut strawberries into 1/4 inch slices. Glaze the cheesecake with the remaining lemon curd. Top the cake with cocentric rings of strawberry slices, starting from the outside and working your way in.

Chocolate Cherry Buttermilk Bundt Cake

Summer BBQ series, Post 4 of 4

Summer is all about the fresh fruit. It’s peak cherry season right now, so if you find yourself with an excess of them, grab your cherry pitter and try out this recipe. Swap out the cherries for any summer berry; strawberries and blueberries would be amazing in this Bundt cake. Bundt cakes are great for BBQs because the design of the pan already adds an element of fancy. You don’t need to do much in the way of decorating one either. A sprinkle of powdered sugar, or a simple glaze, and you’re ready to go. Looks impressive, but requires so little effort. That’s so me. 😉

Chocolate Cherry Buttermilk Bundt Cake | Adapted from Bon Appetit

Ingredients

  • 3 cups all purpose flour
  • 1 tablespoon baking powder
  • 1 teaspoon salt
  • 1 2/3 cups sugar
  • 3/4 cup (1 1/2 sticks) unsalted butter, room temperature
  • 3 large eggs
  • 1 tablespoon lemon zest
  • 2 teaspoons vanilla extract
  • 3/4 cup buttermilk
  • 1 cup of fresh cherries, pitted and cut into quarters
  • 1 cup semi-sweet chocolate chips
  • Powdered sugar

Directions

Preheat oven to 350°F.

Butter and flour 10-inch-diameter Bundt pan.

Whisk flour, baking powder, and salt in medium bowl.

Using electric mixer, beat 1 2/3 cups sugar and butter in large bowl until light and fluffy. Beat in eggs, 1 at a time. Beat in lemon zest and vanilla.

Beat in dry ingredients in 3 additions alternately with buttermilk in 2 additions. Fold in chocolate chips and cherries.

Pour batter into prepared pan. Bake until tester inserted near center of cake comes out clean, about 1 hour.

Cool cake in pan on rack 10 minutes. Turn cake out onto rack and cool completely. (Can be made 1 day ahead. Wrap in plastic and store at room temperature.) Transfer cake to plate, sift powdered sugar over, and serve.

Sour Cream Chocolate Cupcakes

(also, “How to fake a recipe gone wrong”)

Summer BBQ series, Post 2 of 4

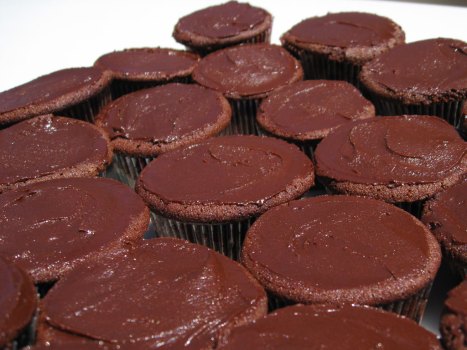
The thing about blogging about food you make is that sometimes you have food failures that are so atrocious that they should never see the light of day.  No one really wants to showcase their duds for all to see, but baking definitely involves a measure of “learn from your mistakes.” So while the chocolate cupcakes featured today were largely failure, you’ll see that with a positive outlook, you can sometimes turn fail into win. It’s just a matter of perspective. 🙂

Most of the time you can take any cake recipe and throw it into a muffin tin with no consequences. This recipe is an exception. The batter rises much more than any standard cake recipe, so loading it up into a muffin pan causes it to sink in the middle when it’s done. The lightness of the batter can’t support the tallish structure of a cupcake, so my end result was 24 sunken cupcakes. Those little divots mocked me.

Well thank goodness these cupcakes were going to a BBQ! The usual problem of taking frosted cakes to a BBQ is that after a while sitting in the sun, the frosting ends up being a gloopy mess. Not a problem with sunken cupcakes though! The cavities proved to be perfect for holding the frosting in its place, and once everything was smoothed out on top, they looked pretty decent given their initial state. Oh, and the frosting “surprise” was a nice touch too.

I’m glad to report that the cake recipe itself is delicious. It yields a very moist, tender crumb, even despite the sunken nature. Try making this in the two 9″ pans like the recipe recommends. I bet your results will be better than mine.

Sour Cream-Fudge Layer Cake with Chocolate Butter Icing | Cook’s Illustrated

Cake Ingredients

1 cup natural cocoa powder
2 teaspoons instant espresso powder , or instant coffee
1 cup boiling water
2 teaspoons vanilla extract
1/2 cup sour cream
16 tablespoons unsalted butter (2 sticks), softened
1 3/4 cups granulated sugar
2 large eggs , at room temperature
1 1/4 cups unbleached all-purpose flour
3/4 teaspoon baking soda
1/2 teaspoon table salt

Icing Ingredients

9 ounces bittersweet chocolate , or semisweet
8 tablespoons unsalted butter (1 stick)
1/3 cup light corn syrup

Directions

1. For the Cake: Adjust oven rack to center position and heat oven to 350 degrees. Grease two 9-by-1 1/2-inch round baking pans with shortening. Line pan bottoms with waxed or parchment paper; grease paper as well. Dust pans with flour; tap out excess.

2. Mix cocoa and instant coffee in small bowl; add boiling water and mix until smooth. Cool to room temperature, then stir in vanilla and sour cream.

3. Beat butter in bowl of electric mixer set at medium-high speed until smooth and shiny, about 30 seconds. Gradually sprinkle in sugar; beat until mixture is fluffy and almost white, 3 to 5 minutes. Add eggs one at a time, beating 1 full minute after each addition.

4. Whisk flour, baking soda and salt in medium bowl. With mixer on lowest speed, add about 1/3 of dry ingredients to batter, followed immediately by about 1/3 of cocoa mixture; mix until ingredients are almost incorporated into batter. Repeat process twice more. When batter appears blended, stop mixer and scrape bowl sides with rubber spatula. Return mixer to low speed; beat until batter looks satiny, about 15 seconds longer.

5. Divide batter evenly between pans. With rubber spatula, run batter to pan sides and smooth top. Bake cakes until they feel firm in center when lightly presesd anad skewer comes out clean or with just a crumb or two adhering, 23 to 30 minutes. Tranfer pans to wire racks; cool for 20 minutes. Run knife around perimeter of each pan, invert cakes onto racks, and peel off paper liners. Reinvert cakes onto additional racks; cool completely before frosting.

6. For the Icing: Melt the chocolate and butter in a medium bowl set over pan of almost-simmering water. Stir in corn syrup. Set bowl of chocolate mixture over a larger bowl of ice water, stirring occasionally, until the frosting is just thick enough to spread. Apply icing onto first cake layer and spread with a long metal spatula, top with second cake layer, top second layer with icing, spread and then ice sides. Serve.

Almond Spritz Cookies

Did you know that almond meal is just ground up almonds? Did you know that almond butter is also just ground up almonds? The key is the length of time that you grind the almonds. You can grind roasted almonds into a powdery form (almond meal), but if you keep going, the oils from the nut cause the powder to become a paste. That’s how you make any sort of nut butter. Try it at home sometime – it’s healthier than the store-bought stuff that’s generally laden with chemical preservatives.

I find it interesting that while I love the flavor of almonds, I can’t really stand them in any sort of solid form. I love almond meal in cookies and cakes, and almond flavoring, but if you put chunks of almonds into my food, I won’t eat them. It goes for all nuts actually. I will, however, eat them plain or in a trail mix. Go figure, call it a quirk.

Anyway, I have almond spritz cookies for you today. Except these didn’t spritz. The dough wasn’t wet enough to extrude properly. Either way, this recipe was almondy delicious and a hit at the BBQ I took them to. Since I couldn’t get the dough to come out of a cookie press, I rolled tablespoon-sized balls and slightly flattened them with a fork before baking.

For a hint of brightness and to really bring out the flavors, add the zest of one lemon to your cookie dough.

Almond “Spritz” Cookies | Adapted from Cook’s Illustrated

Ingredients

1 large egg yolk
1 tablespoon heavy cream
3/4 teaspoon almond extract
1/2 cup sliced almonds
2 cups unbleached all-purpose flour (10 ounces)
1 cup unsalted butter (2 sticks), softened (about 70 degrees)
2/3 cup sugar (about 4 3/4 ounces)
1/4 teaspoon table salt

Directions

  1. Adjust oven rack to middle position; heat oven to 375 degrees. In small bowl, beat yolk, cream, and almond extract with fork until combined; set aside. Grind almonds and 2 tablespoons of the flour in food processor until powdery and evenly fine, about 60 seconds. Combine almond mixture with remaining flour in a medium bowl and set aside.
  2. In standing mixer, cream butter, sugar, and salt at medium-high speed until light and fluffy, 3 to 4 minutes. Scrape down bowl with rubber spatula. With mixer running at medium speed, add yolk/cream mixture and beat until incorporated, about 30 seconds. Scrape down bowl. With mixer running at low speed, gradually beat in flour/almond mixture until combined. Scrape down bowl and give final stir with rubber spatula to ensure that no flour pockets remain.
  3. If using cookie press to form cookies, follow manufacturer’s instructions to fill press; if using pastry bag, follow illustrations 1 through 3 below to fill bag. Press or pipe cookies onto ungreased baking sheets, spacing them about 1-1/2 inches apart. Bake one sheet at a time until cookies are light golden brown, 10 to 12 minutes, rotating baking sheet halfway through baking time. Cool cookies on baking sheet until just warm, 10 to 15 minutes; using metal spatula, transfer to wire rack and cool to room temperature.

Chewy Brownies

Cook’s Illustrated, how I love thee. Your recipes are created using the scientific method, and it calls to the nerd in me. You tell me to use the finest ingredients, not because a company is sponsoring you, but because the products really are excellent. You give me a recipe for brownies that involves three types of chocolate.

Could you be any more perfect? I’d dress you up and take you home to meet the folks if I could.

Seriously.

Okay now, let’s talk about these brownies.

Continue reading

Lemon Pound Cake

Ah, the versatility of the lemon. Even when there’s nothing in my pantry except for flour and sugar, the lemon saves the day and gives me something to bake. (Butter is almost always in my fridge, so it’s a non-issue when it comes to me wanting to bake.) So here I am with yet another lemon post for you today. Let’s explore pound cake. Let’s also pretend that I haven’t lapsed in posting. I have a backlog of stuff coming for you loyal readers.

Pound cake is named as such because historically, it was made with a pound of butter, a pound of flour, and a pound of sugar. For real. Sounds like perfection, doesn’t it? Not according to the good folks at Cook’s Illustrated though. They’ve tweaked the original recipe a bit, much to my sensory pleasure. I strayed away from the recipe just a little bit and substituted all-purpose flour for cake flour (by weight). After all, the occasional home baker may not have cake flour on hand. Or, if you’re like me, you’re just too lazy to go digging for the cake flour in the back of the pantry, on the bottom shelf.

This cake is pretty fantastic, but I highly recommend the lemon glaze if you decide to make it. Otherwise, the cake by itself doesn’t have too much of a lemon zing to it.

Lemon Pound Cake | Cook’s Illustrated

Ingredients

16 tablespoons unsalted butter (2 sticks), plus 1 tablespoon, softened, for greasing pan
1 1/2 cups cake flour (6 ounces), plus 1 tablespoon for dusting pan
1 teaspoon baking powder
1/2 teaspoon salt
1 1/4 cups granulated sugar (8 3/4 ounces)
2 tablespoons grated lemon zest plus 2 teaspoons juice from 2 medium lemons
4 large eggs
1 1/2 teaspoons vanilla extract

For the glaze: 1/4 c. lemon juice plus 1/2 c. granulated sugar

Directions

1. Adjust oven rack to middle position and heat oven to 350 degrees. Grease 9 by 5-inch loaf pan with 1 tablespoon softened butter; dust with 1 tablespoon cake flour, tapping out excess. In medium bowl, whisk together flour, baking powder, and salt; set aside.

2. In glass measuring cup or microwave-safe bowl, microwave butter, covered with plastic wrap, at full power until melted, 1 to 2 minutes. (Alternatively, melt butter in small saucepan over medium heat.) Whisk melted butter thoroughly to reincorporate any separated milk solids.

3. In food processor, process sugar and zest until combined, about five 1-second pulses. Add lemon juice, eggs, and vanilla; process until combined, about 5 seconds. With machine running, add melted butter through feed tube in steady stream (this should take about 20 seconds). Transfer mixture to large bowl. Sift flour mixture over eggs in three steps, whisking gently after each addition until just combined.

4. Pour batter into prepared pan and bake 15 minutes. Reduce oven temperature to 325 degrees and continue to bake until deep golden brown and skewer inserted in center comes out clean, about 35 minutes, rotating pan halfway through baking time. Cool in pan for 10 minutes, then turn onto wire rack.

5. If using lemon glaze, while cake is cooling in pan, bring sugar and lemon juice to boil in small nonreactive saucepan, stirring occasionally to dissolve sugar. Reduce heat to low and simmer until thickened slightly, about 2 minutes.

6. After turning cake onto wire rack, poke the cake’s top and sides with a toothpick and brush on Lemon Glaze. Cool to room temperature, at least 1 hour. (Cooled cake can be wrapped tightly in plastic wrap and stored at room temperature for up to 5 days.)

Lemon Poppyseed Cake

It’s kind of great to have friends with lemon trees. It means lemony goodness all year-round… lemon bars, lemon meringue, lemonade, and in this case, lemon poppyseed cake. I have to say that lemons are my favorite fruit to bake with. Yes, even more than strawberries! I know some of you are shocked by this, but here’s something to put your mind at ease: lemons are my favorite to bake with; strawberries are my favorite to eat. Feel better?

For those that don’t know me, I’m an avid strawberry fan. I order ice tea with a shot of strawberry Torani syrup wherever I can, I horde strawberry Skittles and Starburst, and I always go for strawberry jam on toast and in thumbprint cookies. Noms.

Anyway, lemons are probably my second favorite fruit to have in a baked good, but they are just so easy to use and find that they come in first for when I want to bake. This lemon poppyseed cake won’t disappoint you. Perfect as a breakfast bread, slathered with some good ol’ butter, this is the right way to start your morning. (Thanks AC for the lemons!)

Lemon Poppyseed Cake | Butter Sugar Flour Eggs by Gale Gand

Ingredients

  • 1/3 cup poppyseeds
  • 1 tbsp freshly grated lemon zest
  • 1 cup milk
  • 2 eggs
  • 1 1/2 cups sugar
  • 2 cups (10 oz) all-purpose flour
  • 2 1/2 tsp baking powder
  • 1/2 tsp ground cinnamon
  • 1/4 tsp ground nutmeg
  • 3/4 cup vegetable oil
  • 1 tsp vanilla extract
  • 1 tsp almond extract

Directions

Mix the poppyseeds, lemon zest, and milk together. Set aside.

Preheat oven to 350F. Line a 6-cup load pan with parchment paper.

Whip the eggs and sugar in a mixer fitted with a whisk attachment until light and fluffy.

Sift dry ingredients together. With mixer running, drizzle the oil and extracts into the egg mixture. With mixer running, add alternating batches of dry ingredients and milk mixture into the egg mixture. Stop the mixer to scrape the bowl between additions.

Batter will be slightly thin. Pour into the pan.

Bake 1 to 1 1/4 hours, until the center is raised and cracked and the whole cake is firm and dry on the top. Do not underbake, as this cake falls easily.

Let cool in pan for 5 minutes, then turn out onto a wire rack and let cool before serving.

Carrot Cake – Part Deux

Hey, look! A post! Yes, I am back from my unannounced hiatus. Between work, sick cat, work, snowboarding, and work, I decided to take a little time off from writing. Actually, that’s the thing about having a food blog – it’s never the writing that consumes too much time, it’s actually the pictures. Looking through my stuff, it’s probably relatively obvious that I don’t have a fancy schmancy SLR. What I don’t have in equipment is made up for in food posing and creative (read: cheap) lighting.

I think maybe if I didn’t care about taking “food porn” worthy pictures, I’d be posting a whole lot more. But hey, I have a lot of fun with the photography anyway. I’d rather not skip it if possible. Sometimes though, in a hurry to either eat what I made or out of sheer laziness, my pictures come out something like today’s. Yes, I tried to ice the cake when it wasn’t cool enough. Who cares? I call this not carrot cake with cream cheese frosting, but carrot cake with cream cheese glaze. I win.

So what’s with this blurry carrot cake? Oh, it’s nothing really – just a spiced loaf of goodness that might make a rough day a little bit better.

Continue reading

Chocolate Mint Cookies

I don’t care that the holidays are over. I’m still going to pair peppermint and chocolate together. Just try and stop me! When they produce a cookie this good, you won’t think to protest either. If I hadn’t been too lazy to make the icing drizzle, they’d look a whole lot prettier, but 1) I hate dealing with powdered sugar (it gets EVERYWHERE), and 2) I don’t care if it looks pretty, just as long as it tastes fantastic. And these cookies do. Read on – I bet you’re intrigued.

Continue reading

Chocolate Chip Butterscotch Cookies

Happy One Year, Buttered BlasphAmy!

Happy New Year to all! With the coming of the new year also comes the one year anniversary of Buttered BlasphAmy. Holy crap, I wasn’t exactly sure that I’d make it a year with this project. Granted, at times I slipped off for a couple (or few) weeks, but I never got too far away. I’ve actually averaged just over one post per week overall, which is a little admirable when I think of it. I know, there are plenty of bloggers out there who post daily or even more, but for a casual blogger like myself (read: not professional), I think it’s been a very respectable run. Thank you readers, old and new, for humoring me here on my little piece of the Web.

So what kind of post do I do for such a milestone? I had considered something fancy and intricate, but if you’ve been keeping up with this blog, you’d know that that is usually not my style. So I opted for something with less fanfare. Chocolate chip cookies. That’s a classic, and I can’t believe I haven’t written a post about them yet. That said, here you go: Anniversary Chocolate Chip Cookies with Butterscotch. Here’s to another year of deliciousness and om noming.

Continue reading